
Easy use series flush-mounted detectors PIR 360° Ceiling Mount Occupancy Sensor
Advanced PIR motion detection sensor with 360° ceiling mounting capability for automated lighting control in industrial and commercial environments.
- PIR motion detection technology
- Accurate ON/OFF output control
- Daylight priority and daylight threshold working modes
- Daylight learning function capability
- Remote control/potentiometer adjustment for detection area, hold time, and daylight threshold
- Maximum detection range: 10-14m diameter
- Push terminal for manual load control
- Full-automatic and semi-automatic operation modes
- Multiple sensor synchronization via parallel S terminals
- Intelligent IQ mode for adaptive operation
| Input/Output Parameters | |
|---|---|
| Input Voltage | 100-240V AC |
| Rated Voltage | 230V AC |
| Power Consumption | 20mA max |
| Output Signal | ≤0.5W @220V DC |
| Working Mode | ON/OFF |
| Surge Protection | 2KV(L/N, EN61000-4-5) |
| Surge Capacity | 30A (50% Ipeak, twidth=500us, 230Vac full load, cold start) |
| Load Capacity | 1200W resistive loading or 800W inductive loading |
| Sensor Parameters | |
| Function | PIR motion detection + daylight sensor |
| Detection Area | Rotate potentiometer or remote setting: 100%/75%/50%/25% |
| Hold Time | Rotate potentiometer or remote setting: 5s/30s/1min/3min/5min/10min/20min/30min |
| Daylight Sensor | Rotate potentiometer or remote setting: 5Lux/15Lux/30Lux/50Lux/100Lux/150Lux/Disable |
| Mounting Height | 2.5-4m (typical value: 3m) |
| Application Environment | |
| Drill Hole | Φ65mm |
| Working Temperature | -25℃ to +50℃ |
| Storage Temperature | -40℃ to +80℃ |
| Certification & Standards | |
| Certificate | Compliant with CE |
| Environmental Requirements | Compliant with RoHS |
| IP Rating | IP20 |

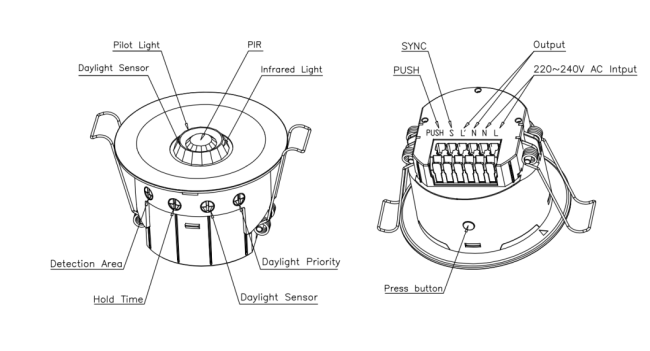
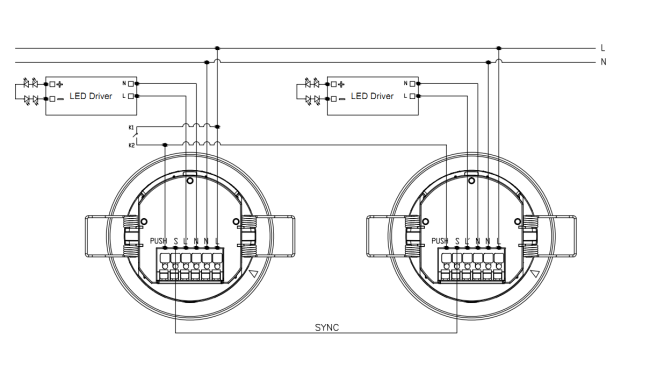
- LN is the AC input terminal, and L'N is the AC output terminal. Ensure correct wiring sequence.
- Single load requirements: resistive loads ≤1200W, capacitive loads ≤800W. For multiple loads, use AC contactor or solid-state relay to prevent sensor damage from inrush current.
- S synchronization port must NOT be connected to the N line (neutral wire) to avoid sensor damage.

When powered on, the sensor indicator turns on for 35 seconds for initialization, then automatically turns off. Sensor parameters can be configured via potentiometer or remote control after initialization.
- Detection Area: 100%
- Hold Time: 2 seconds
- Daylight Sensor: Disabled
- Daylight Priority: Disabled
- LED Indicator: ON

| Gear | Coverage |
|---|---|
| 1 | 25% |
| 2 | 50% |
| 3 | 75% |
| 4 | 100% |

| Gear | Duration |
|---|---|
| 1 | Test 2s |
| 2 | 30s |
| 3 | 1min |
| 4 | 5min |
| 5 | 10min |
| 6 | 30min |
| 7 | Pulse mode |
| 8 | IQ Mode |

| Gear | Threshold Value |
|---|---|
| 1 | 5lux |
| 2 | 15lux |
| 3 | 30lux |
| 4 | 50lux |
| 5 | 100lux |
| 6 | 150lux |
| 7 | Disable |

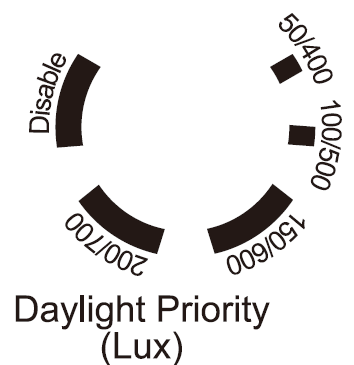
| Gear | Switch On / Switch Off Values |
|---|---|
| 1 | 50lux / 400lux |
| 2 | 100lux / 500lux |
| 3 | 150lux / 600lux |
| 4 | 200lux / 700lux |
| 5 | Disable |
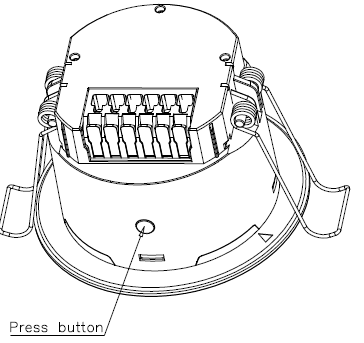
Press the "Press button" to activate full-automatic mode, where the sensor automatically switches the load on when motion is detected and off after the hold time when no motion is detected. Press the button again to switch to semi-automatic mode, where the sensor only switches the load on via wall push button while maintaining automatic switch-off functionality.

- Installation should be performed by professional electricians only. Disconnect power before installation and wiring.
- Optimal installation height is 3m. Avoid outdoor installation to prevent false triggering from ambient temperature changes.
- Do not install in locations sensitive to temperature or airflow changes to avoid false triggering or sensor failure.
- Ensure detection range is unobstructed by screens, furniture, or large objects.
- Avoid reflective objects directly in front of the sensor to prevent false triggering from reflected light.
- Keep away from large electromagnetic radiation equipment (Wi-Fi routers, cameras, microwave ovens). Maintain minimum 2-meter distance to prevent interference.
- Sensing distance may vary based on installation height and ambient temperature.
Due to the complexity of product technology and variations in application environments, this specification is provided for reference only. We reserve the right to modify product specifications without prior notification and make no legal commitments or guarantees. Users are encouraged to supplement or modify specification contents based on their application experience.
For detailed technical information and application support, please contact our sales representatives.
Get in Touch
Have questions about our products or want to discuss a custom order? Our team is ready to help you.