
1/4" 2V025-08 Airtac Type Fluid Control Pneumatic Solenoid Valve 2/2 Way Direct Acting NC
1/4'' 2V025-08 Airtac Type Fluid Control Pneumatic Solenoid Valve 2/2 Way Direct Acting NC
The Airtac 2V025 series pneumatic solenoid valve is a functional replacement for the SMC VXP series.
Feature of 2V025 Series Aluminum Solenoid Pneumatic Air Valve 2 Way, Direct Acting, Normally Closed:
1. Direct-acting normally closed 2/2-way solenoid valve. High sensitivity makes it possible to change direction quickly.
2. The structure is compact and small.
3. The valve body is made of heat-resistant brass and the coil meets Class B standards. The seals are made of fluoro rubber (VITON) and are suitable for many types of working media.
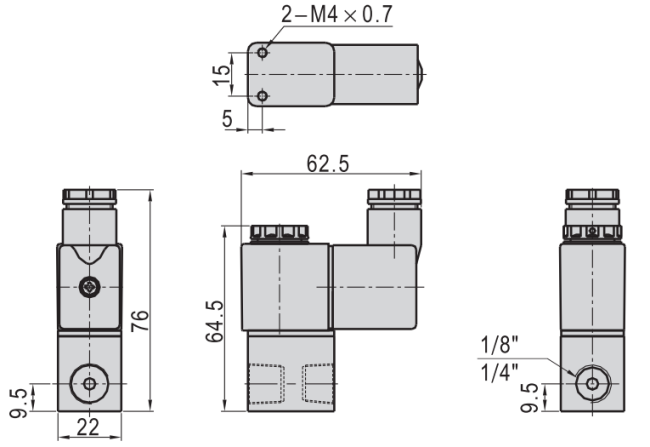
Main dimension of 2V025-08 Airtac Type Fluid Control Pneumatic Solenoid Valve:
Technical parameters of Airtac Type 2/2 Way NC Fluid Control Solenoid Valve:
| Model | 2V025-06 | 2V025-08 | 2V130-10 | 2V130-15 | 2V250-20 | 2V250-25 |
| Fluid | Air. Water. Oil | |||||
| Acting | Direct acting | Internally piloted acting | ||||
| Type | Normally closed | |||||
| Orifice size(φmm) | 2.5 | 2.5 | 13.0 | 13.0 | 25.0 | 25.0 |
| Cv valve | 0.23 | 0.25 | 6.20 | 6.20 | 13.00 | 13.00 |
| Port size | 1/8" | 1/4" | 3/8" | 1/2" | 3/4" | 1" |
| Viscosity limit | Under 20CST | |||||
| Pressure range | 0~1.0MPa (0~145psi) | 0.05-1.0MPa (7~145psi) | ||||
| Proof pressure | 1.5MPa(215psi) | |||||
| Material body | Aluminum, Anodized | Brass | ||||
| Seal material | NBR | NBR | ||||
| Min. activating time sec | 0.05 sec and below | |||||
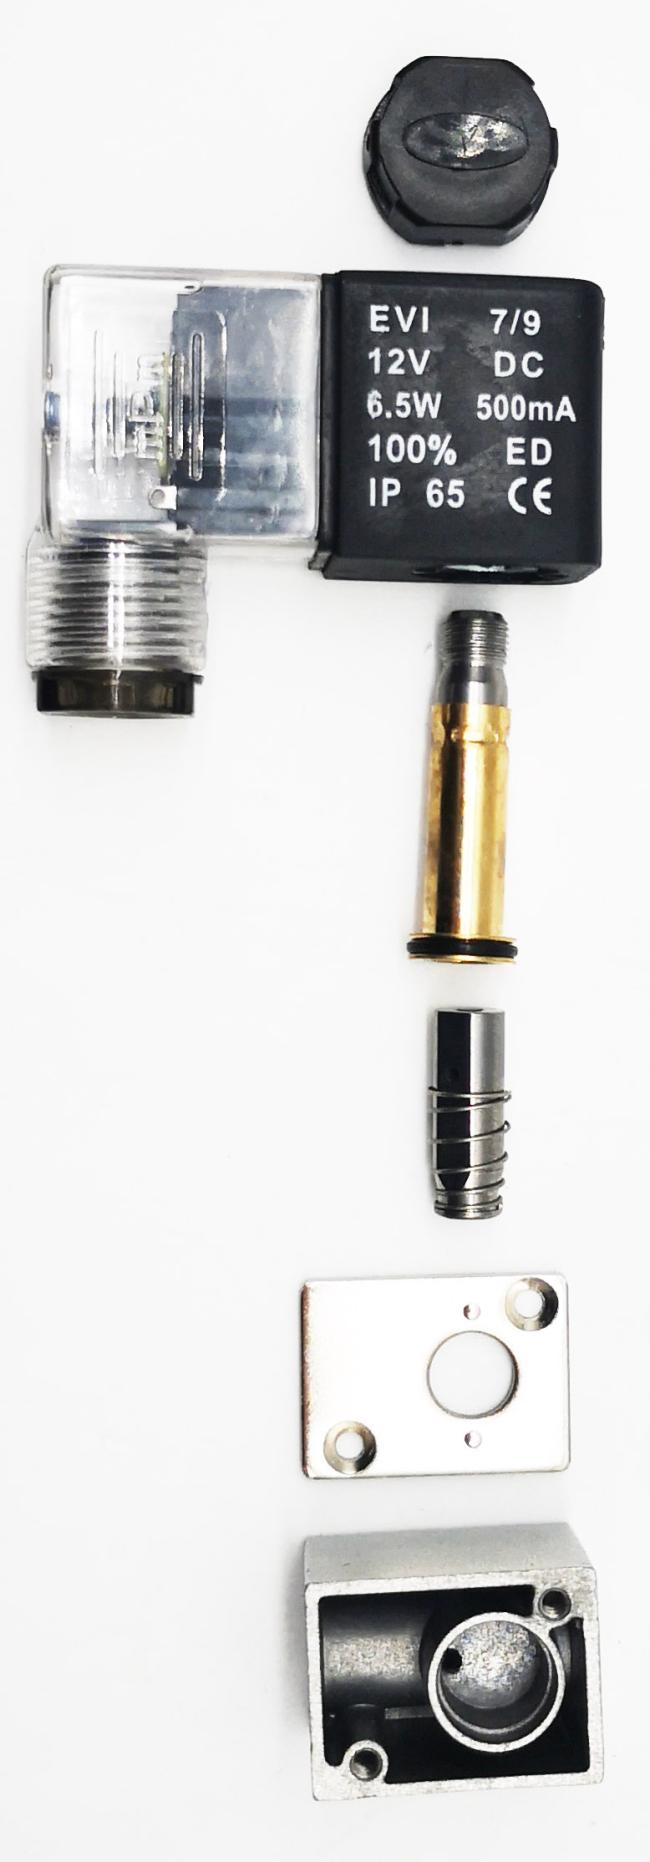
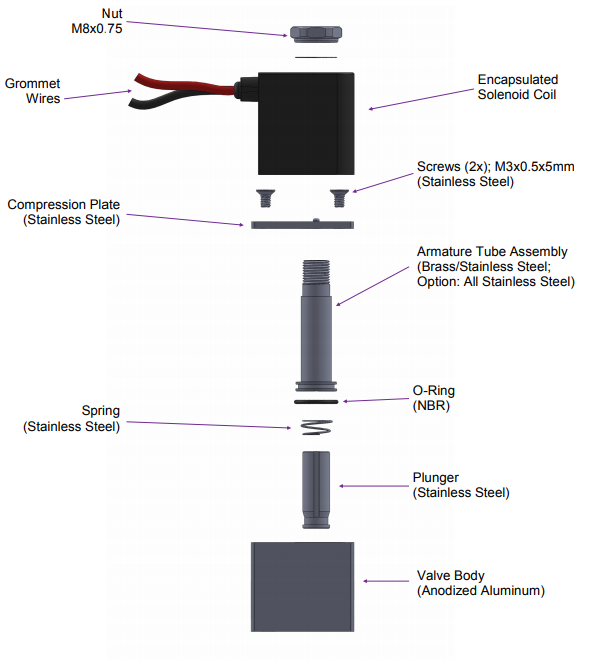
Disassembly show of Direct Acting Normally Closed 2V025-08 Air Solenoid Valve:
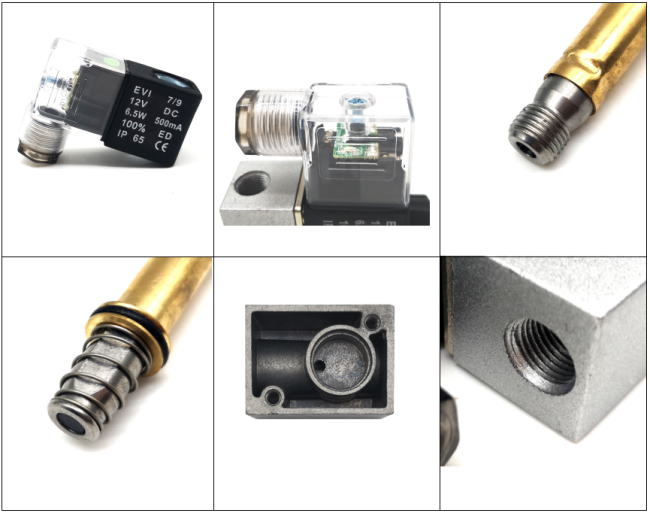
Details enlargement of 1/4'' AIRTAC Type Aluminum Pneumatic Solenoid Air Valve:
More display of 2V025-08 AIRTAC Type 2 Position 2 Way Pneumatic Air Valve:
Packing display of 2V025-08 Airtac Type Fluid Control Solenoid Pneumatic Valve:
Installation of 2V025-08 Airtac Type Fluid Control Pneumatic Solenoid Valve:
To Connect the Valve Inlet & Outlet:
Connect the inlet & outlet to the valve ports according to the flow direction arrow marked on the valve.
To Install the Coil:
Put the coils on to the armature tube of the valve. Place the lock washer & nut on to the armature tube. Hand tighten the nut, then use a wrench to tighten the nut another quarter-turn. Do not over-tighten the nut, as it may cause the armature tube to fail prematurely.
To Connect a DIN Coil:
1. Remove the screw from the plastic DIN housing & unplug it from the DIN coil
2. From the screw opening, push the terminal block out from the plastic DIN housing.
3. Note the “1”, “2”, and ground “⏚” symbols on the underside of the DIN enclosure.
4. For DC DIN Coils, connect “1” to your Positive Lead & “2” to your Negative lead.
5. For AC DIN Coils, connect “1” to your HOT lead, “2” to your Neutral lead, & “⏚” to your ground if required.
Do not energize the coil without installing it onto the valve or connect the coil to a different voltage than specified. This will burn the coil and could create fire hazards.
Welocome to your any question and inquiry!
Get in Touch
Have questions about our products or want to discuss a custom order? Our team is ready to help you.