
Galvanized Steel Wire Chain Link Fabric Fencing Mesh For Gardens 5FTx50FT
5FTx50FT Galvanized Steel Wire Chain Link Fence Fabric For Gardens
Galvanized Steel Wire Chain Link Fence Fabric Specification
| Name | chain link fence roll |
| Length | 50 ft (15m) |
| Height | 5ft |
| Wire Dia | 2.0mm-4.0mm |
| Finish | Hot-dip galvanized |
Galvanized Steel Wire Chain Link Fence Fabric Characteristics
- Galvanized to provide strength and superior corrosion resistance
- The wire is woven into a 2-in mesh
- Knuckle/Knuckle selvage (bent over) on the top and bottom of the fabric to help eliminate sharp edges
- Easy to install and maintenance-free
-
Primary Recommended Use Containment Color/Finish Family Silver Manufacturer Color/Finish Galvanized Warranty 10-year limited Common Height (Feet) 5 Primary Material Steel Common Length (Feet) 50
If you Make a Plan to buy Chain Link Fabric Fencing Mesh
Below is the installation instruction
- 1.Make a drawing of your fence in the space
Use chart below to determine exact number of terminal and line posts you will need based on your final layout measurements.
- 2.Measure the size
- 3.Install Fittings to Terminal Posts
Review the Material Check List on reverse side for descriptions and number of fittings required. After concrete footings have hardened, slip the tension bands over terminal posts making sure they are evenly spaced. The long, flat surface should face the outside of the fence. Carefully add brace bands making sure not to bend or distort. Bolt heads should be on the outside of the fence and threaded ends inside. Fit all post caps.
- 4. Install the top rails
Place an eye top fitting on the end of each line post. Flat side should be toward outside of the fence. Insert one length of top rail pipe through an eye top nearest a terminal post. Insert a rail end on the top rail and attach to terminal post with a brace band. Fasten with a 5/16” x 1-1/4” carriage bolt. Continue to join lengths of top rail by forcing swedged (or crimped) ends of top rail together through eye tops. (If joining non- swedged top rail sections, sleeves can be used as pictured below). When next terminal post is reached, measure and cut the top rail to fit tightly between the last length of top rail and the rail end fastened to the brace band on the terminal post. Fasten with a carriage bolt.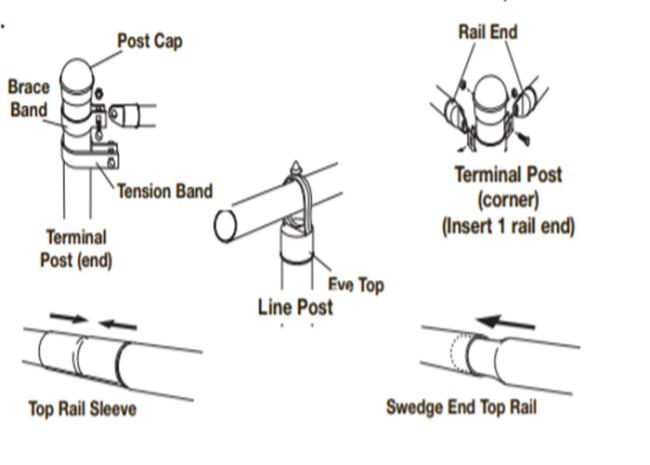
- 5.Affix and Stretch Chain Link Fabric
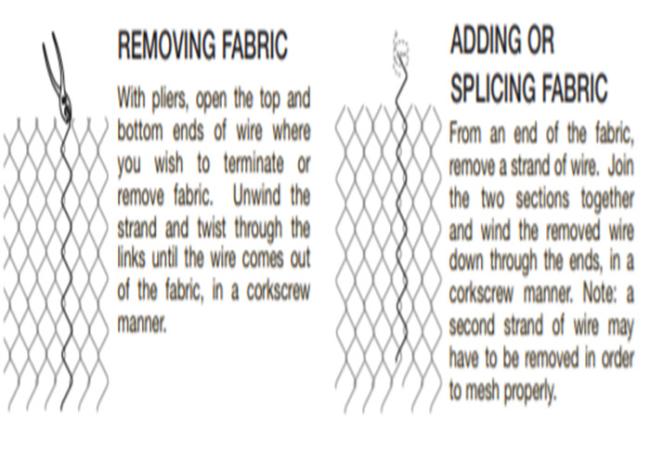
1)Beginning at a terminal post, lay the chain link fabric on the ground and unroll to next terminal post. Unroll enough fabric to cover the opening between the terminal posts. (See figure below for adding and removing fabric). Insert a tension bar through the end of the fabric and attach to tension bands which were previously placed on the terminal posts. Fasten (not too tightly) with 5/16” x 1-1/4” carriage bolts - heads on the outside of the fence and threaded ends inside. Stand the entire fence section upright, leaning against the f r a m e w o r k . Loosely attach fabric to top rail with tie wires to hold
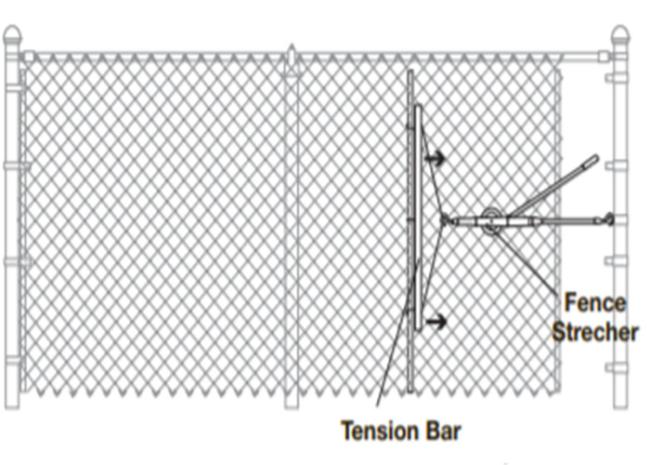
- 2)From the terminal post, which already has fabric attached, stretch the fabric to the opposite terminal post (see diagram at right). Insert a tension bar 4 feet inside the open end of the fabric. Fasten one end of the fence stretcher to the tension bar or stretcher bar and the other end to the terminal post. Stretch the fabric until there is a slight tension when squeezed by hand. Either add or remove fabric for exact length. Insert a tension bar at end and connect to the tension bands on the terminal post.
![]()
- 6.Hang Gates
- Attach frame hinges to gate frame. Install post hinges to gate post. Install top post hinge with pin pointing down and bottom post hinge with pin pointing up. This will prevent the gate from being lifted off the hinges. Place gate in position by aligning the top of the gate with the top of the fence and adjust the hinges to allow for a full swing. Install gate latch at desired height that’s suitable to your usage and fasten all bolts. Follow the same directions to install Drive Gates.

Get in Touch
Have questions about our products or want to discuss a custom order? Our team is ready to help you.