
39210-2ECC1 Car Oxygen Sensor For Hyundai Sonata Elantra Tucson Santa Fe Accent / Kia Optima Sportage Ceed Sorento
| Specification | Details |
|---|---|
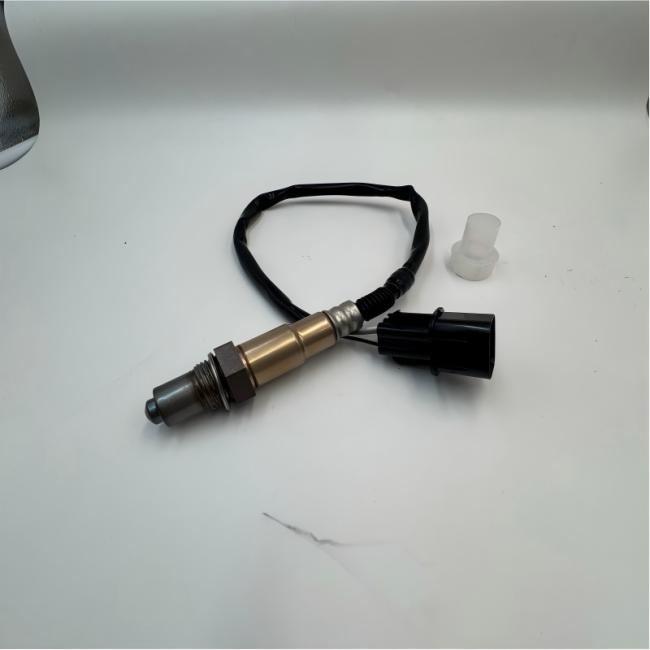
| Product Type | Lambda Sensor (Oxygen / O2 Sensor) |
| OE Part Number | 39210-2ECC1 (also 39210‑2ECC1) |
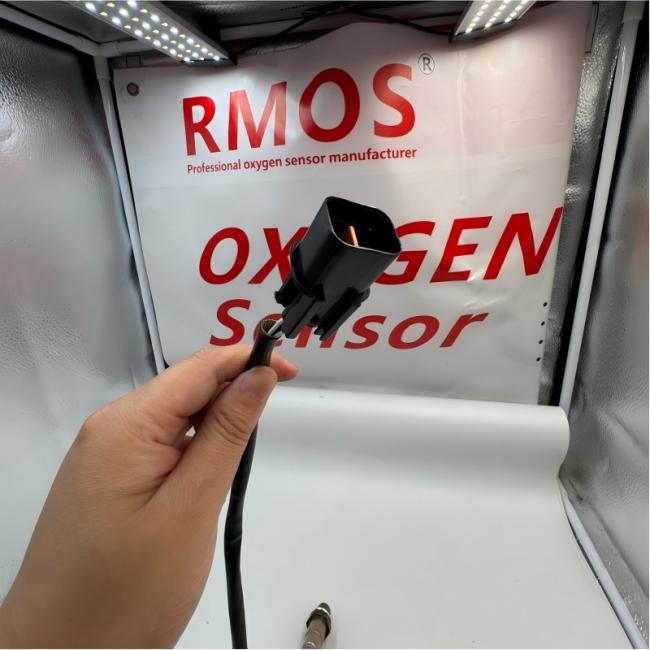
| Number of Pins / Wires | 4‑pin connector, 4‑wire configuration |
| Cable Length | Approx. 405 mm (15.9 inches) |
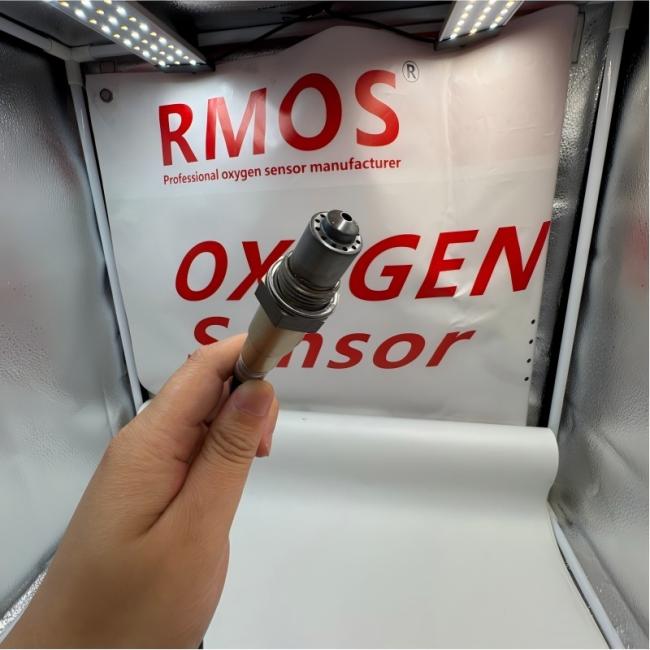
| External Thread Size | M18 * 1.5 |
| Spanner Size | 22 mm (7/8″) |
| Connector Shape | 4‑pin female rectangular / oval (typical Hyundai/Kia design) |
| Connector Colour | Black or grey (varies by manufacturer) |
| Sensor Type | 4‑wire heated switching‑type zirconium oxide sensor |
| Heater Resistance Reference | Approx. 11 – 18 Ω at 20 °C / 68 °F(typical range for Hyundai/Kia 4‑wire heated O₂ sensors) |
| Fitting Position | Downstream (Post‑Catalyst / Rear) – Bank 1, Sensor 2 |
| Operating Principle | The sensor measures oxygen concentration in exhaust gases downstream of the catalytic converter. A zirconium‑oxide sensing element generates a voltage signal that varies between approx. 0.6 – 1.0 V (rich mixture) and near 0 V (lean mixture). The ECU uses this signal to monitor catalytic converter efficiency and refine fuel trim adjustments. |
Technical Notes:
-
This is a downstream oxygen sensor — also referred to as a rear O₂ sensor or diagnostic sensor. It is installed after the catalytic converter and is primarily responsible for monitoring catalyst efficiency and fine‑tuning the ECU's fuel trim strategy.
-
The 4‑wire heated design brings the ceramic sensing tip up to operating temperature within seconds, enabling the ECU to enter closed‑loop fuel control earlier and significantly reduce cold‑start emissions.
-
The internal heater is powered by the vehicle's 12 V electrical system and is controlled by the ECU. Heater resistance typically falls within 11 – 18 Ω at 20 °C.
-
The centre ceramic element is made of Zirconium Oxide, Alumina and Yttrium Oxide, with platinum vapour‑deposited onto the sensing surfaces. A spinel coating protects against solid particles in the exhaust gas.
-
All sensors are 100% tested to meet or exceed original equipment quality standards.
This lambda sensor is an original equipment (OE) component for Hyundai and Kia vehicles. The following OEM numbers are direct cross‑references. Always verify physical fitment (connector shape, cable length and thread size) before purchasing — minor variations may exist between manufacturers.
| Type | Part Number(s) |
|---|---|
| Hyundai / Kia OEM Numbers | 39210‑2ECC1, 392102ECC1 |
| Related Hyundai / Kia Downstream Sensors | 39210‑2E411, 39210‑2M410, 39210‑2B100, 39210‑2B030 |
| Aftermarket Interchange Numbers | ES20322‑12B1, ADBP700113, 64179, LEB655 |
| Similar Application Numbers | 39210‑04000(front sensor, different position), 39210‑23710, 39210‑2G650 |
Cross-Reference Notes:
-
ES20322‑12B1 and ADBP700113 are common aftermarket interchange numbers for downstream O₂ sensors on Hyundai/Kia 4‑cylinder petrol engines.
-
39210‑2E411 and 39210‑2M410 are functionally identical rear/downstream sensors used across the Hyundai/Kia range.
-
Do not confuse this downstream sensor with front / upstream sensors such as 39210‑04000 or 39210‑23710 — they are not interchangeable.
-
Aftermarket sensors may have slightly different cable lengths, connector colours or tip designs while still using the same OE cross‑reference number. Physical inspection of your original sensor is strongly recommended.
This lambda sensor is a downstream (rear) oxygen sensor for a wide range of Hyundai and Kia 4‑cylinder petrol engines manufactured from the mid‑2000s through the 2010s. It is typically installed after the catalytic converter (Bank 1, Sensor 2) and serves as the diagnostic / catalyst‑monitoring probe.
| Model | Generation | Year Range | Notes |
|---|---|---|---|
| Sonata | NF(2005‑2010), YF(2010‑2014) | 2006 – 2014 | 2.0L / 2.4L petrol. Downstream (rear) position. |
| Elantra | HD(2006‑2010), MD(2010‑2015) | 2007 – 2015 | 1.6L / 1.8L / 2.0L petrol. Downstream (rear) position. |
| Tucson | JM(2004‑2010), LM(2010‑2015) | 2005 – 2015 | 2.0L petrol (Theta II). Downstream (rear) position. |
| Santa Fe | CM(2006‑2012), DM(2012‑2018) | 2006 – 2018 | 2.0L / 2.4L / 2.7L petrol. Downstream (rear) position. |
| ix35 | LM(2010‑2015) | 2010 – 2015 | 2.0L petrol. Downstream (rear) position. |
| i30 | FD(2007‑2011), GD(2011‑2016) | 2007 – 2016 | 1.6L / 2.0L petrol. Downstream (rear) position. |
| i40 | VF(2011‑2019) | 2011 – 2019 | 2.0L petrol. Downstream (rear) position. |
| Accent | MC(2005‑2010), RB(2010‑2017) | 2006 – 2017 | 1.4L / 1.6L petrol. Downstream (rear) position. |
| Genesis Coupe | BK(2008‑2016) | 2009 – 2016 | 2.0L turbo petrol. Downstream (rear) position. |
| Model | Generation | Year Range | Notes |
|---|---|---|---|
| Optima | MG(2005‑2010), TF(2010‑2015) | 2006 – 2015 | 2.0L / 2.4L petrol. Downstream (rear) position. |
| Sportage | KM(2004‑2010), SL(2010‑2015) | 2005 – 2015 | 2.0L petrol (Theta II). Downstream (rear) position. |
| Cee'd | ED(2006‑2012), JD(2012‑2018) | 2007 – 2018 | 1.6L / 2.0L petrol. Downstream (rear) position. |
| Sorento | BL(2002‑2006), XM(2009‑2014) | 2005 – 2014 | 2.4L / 3.5L petrol. Downstream (rear) position. |
| Soul | AM(2008‑2013), PS(2013‑2018) | 2009 – 2018 | 1.6L / 2.0L petrol. Downstream (rear) position. |
| Rio | JB(2005‑2011), QB(2011‑2017) | 2006 – 2017 | 1.4L / 1.6L petrol. Downstream (rear) position. |
| Cerato / Forte | LD(2004‑2008), TD(2008‑2012) | 2005 – 2012 | 1.6L / 2.0L petrol. Downstream (rear) position. |
| Carnival / Sedona | VQ(2006‑2014) | 2006 – 2014 | 2.7L / 3.5L / 3.8L petrol (V6). Downstream (rear) position. |
Fitment Notes:
-
This is a downstream (rear / Bank 1, Sensor 2) oxygen sensor. It is installed after the catalytic converter.
-
Upstream and downstream O₂ sensors are NOT interchangeable. In 99% of modern Hyundai/Kia vehicles, they cannot be swapped.
-
Compatible engine families include: Theta (2.0L / 2.4L), Gamma (1.4L / 1.6L), Beta (1.6L / 1.8L / 2.0L), Delta (2.5L / 2.7L / 3.0L / 3.3L / 3.5L / 3.8L) petrol engines.
-
Not compatible with diesel engines — diesel O₂ sensors use different calibration parameters and part numbers.
-
If your vehicle is not listed above, verify using the vehicle's VIN or by physically inspecting your original sensor's connector, cable length and position.
A faulty downstream oxygen sensor degrades the ECU's ability to monitor the catalytic converter and refine fuel trim. While the engine may still run, fuel economy and emissions are negatively affected. Replace your lambda sensor immediately if you experience any of the following:
Check Engine Light (MIL) Illumination
-
The Check Engine Light illuminates on the dashboard — often the first and only obvious symptom.
-
Common OBD‑II fault codes for a failing downstream sensor include:
-
P0136 – P0141 — O₂ Sensor Circuit Malfunction / Heater Circuit Malfunction (Bank 1, Sensor 2)
-
P0036 – P0037 — HO₂S Heater Control Circuit (Bank 1, Sensor 2)
-
P0420 — Catalyst System Efficiency Below Threshold (Bank 1) — a failing downstream sensor can incorrectly indicate a bad catalytic converter
-
P0133 / P0153 — O₂ Sensor Slow Response
-
Performance & Fuel Economy Symptoms
-
Increased fuel consumption — A failing downstream sensor can misreport catalyst efficiency, affecting the ECU's fuel trim adjustments. Fuel economy may drop by 10‑15% or more without triggering drivability changes.
-
Poor engine performance — Hesitation or stumbling during acceleration, particularly noticeable in turbocharged models (e.g., Genesis Coupe 2.0T).
-
Rough idle or unstable operation — The ECU may default to preset open‑loop parameters, causing the engine to run unevenly at low speeds.
Exhaust & Emissions Symptoms
-
Failed emissions test — Incorrect sensor readings prevent the catalyst monitor from completing, causing an automatic “not ready" state.
-
Black smoke from exhaust — Indicates an excessively rich air‑fuel mixture and incomplete combustion.
-
Strong fuel odour — Unburned fuel present in the exhaust stream.
-
Failed OBD‑II readiness monitors — The O₂ sensor and catalyst monitors remain “Not Ready,“ blocking an emissions inspection pass.
Potential Causes of Sensor Failure:
-
Normal wear and tear — Lambda sensors typically degrade after 100,000 – 160,000 km (60,000 – 100,000 miles) of continuous exposure to high‑temperature exhaust gases.
-
Heater circuit failure — The internal heating element opens or shorts, causing the sensor to respond extremely slowly or not at all when cold.
-
Contamination (“sensor poisoning") — Oil, coolant, silicone‑based sealants or the use of leaded fuel permanently coats the ceramic sensing tip, destroying its ability to detect oxygen.
-
Carbon poisoning — Carbon particles block the sensing element; the ECU reduces fuel delivery, causing a lean mixture.
-
Oil / dust contamination — Oil or dust blocks the sensor’s atmospheric vent; the ECU increases fuel delivery, causing a rich mixture.
-
-
Physical impact damage — Dropping the sensor or impact from road debris can crack the fragile ceramic element.
-
Wiring / connector issues — Damaged wiring, loose connections, corrosion or an intermittent open / short circuit can trigger fault codes even when the sensor itself is healthy.
-
Exhaust leaks upstream of the sensor — False oxygen readings from an upstream exhaust leak will cause erratic sensor output.
Diagnostic Tip:
-
A failing downstream oxygen sensor frequently triggers the MIL without any noticeable drivability change initially. Fuel consumption, however, is still negatively affected.
-
To diagnose a faulty sensor, measure the heater coil resistance (should be stable at 11 – 18 Ω at 20 °C — an open or short circuit indicates failure). Monitor the sensor voltage output with an OBD‑II scanner under steady‑state driving — a healthy sensor cycles continuously between approx. 0.1 V – 0.9 V.
-
If voltage output remains steady, does not reach the expected 0.6 V – 1.0 V range under rich conditions, or changes very slowly, the sensor is failing.
1. Confirm Fitment — Physical Inspection is Essential
-
This is a direct‑fit downstream sensor with a 4‑pin female rectangular / oval connector, M18 * 1.5 thread and approx. 405 mm (15.9″) cable length.
-
Always cross‑reference your old sensor's part number, connector shape, pin count, cable length and thread size before ordering.
-
Do not purchase based solely on the OE number — aftermarket manufacturers may produce sensors with the same OE reference but with slight differences in cable length, connector shape or calibration parameters. If the connector does not match, do not install.
-
Physical inspection of your original sensor is strongly recommended.
2. Check Connector Colour and Shape
-
The OE connector for this part is generally black or grey plastic with a rectangular / oval 4‑pin female design.
-
Aftermarket sensors may have green or other coloured housings while retaining the 4‑pin rectangular design. Verify compatibility with your vehicle's wiring harness before purchase.
-
The connector should have 4 pins arranged in a rectangular / oval pattern.
3. Verify Sensor Position — Downstream Only
-
This is a downstream (post‑catalyst / rear) oxygen sensor, installed after the catalytic converter.
-
Upstream and downstream O₂ sensors are NOT interchangeable. Upstream sensors (pre‑catalyst / front) use different part numbers such as 39210‑04000, 39210‑23710 or 39210‑2B100.
-
Verify the location of your old sensor (Bank 1, Sensor 2 for downstream vs. Bank 1, Sensor 1 for upstream) before ordering.
4. Replacement Interval
-
Lambda sensors degrade gradually over time, often without triggering immediate fault codes. Their switching response becomes slower and their voltage range narrows.
-
Replacement every 100,000 – 160,000 km (60,000 – 100,000 miles) is recommended to maintain optimal fuel efficiency, catalytic converter health, proper emissions output and correct OBD‑II monitor readiness.
-
Even if no Check Engine Light is present, an aged sensor will still respond more slowly than a new one, negatively affecting fuel economy and emissions.
5. Installation Tips
Before Installation:
-
Allow the exhaust system to cool completely before removal — the exhaust manifold and catalytic converter remain dangerously hot for a significant period after engine shutdown.
-
Disconnect the vehicle's battery negative (-) cable before starting work to prevent electrical issues and potential ECU damage.
-
Use a high‑quality O₂ sensor socket (22 mm / 7/8″) with an offset design to prevent stripping the sensor's flats and to provide better access in confined engine bays. A standard socket can easily damage the sensor housing or its flats.
Removal of the Old Sensor:
-
If the sensor is difficult to remove when cold, it may be easier when the exhaust is warm (run the engine for 1‑2 minutes then allow it to cool slightly). Exercise extreme caution to avoid burns.
-
Do not use excessive force — damage to the exhaust bung threads can result in expensive repairs and potentially require exhaust component replacement.
-
Disconnect the electrical connector carefully — press the locking tab and pull only the connector housing, never the wires themselves.
-
Inspect the old sensor's connector, cable and tip for signs of contamination (oil, soot, coolant residue), melting or cracking.
Installation of the New Sensor:
-
Do not apply additional anti‑seize compound unless the new sensor's threads are completely dry. Many OE‑type sensors are factory‑coated with anti‑seize. Adding extra can contaminate the sensor tip.
-
Do not use silicone sealants anywhere near the exhaust system — silicone vapour will permanently contaminate and destroy the oxygen sensor.
-
Avoid touching the sensor tip — skin oils contaminate the ceramic sensing element and cause premature failure.
-
Do not drop the sensor — the ceramic element inside the metal housing is brittle and can crack upon impact, rendering the sensor inoperative even if no external damage is visible.
-
Tighten to the correct torque — typical torque for an M18 * 1.5 oxygen sensor is 40 – 50 Nm (30 – 37 ft‑lb). Refer to your vehicle's service manual for the exact specification.
-
CAUTION: Overtightening can damage threads in the exhaust bung; undertightening may cause exhaust leaks and false oxygen readings.
-
-
Route the wiring harness securely using the original clips and routing guides to prevent contact with hot exhaust components (exhaust manifold, catalytic converter, EGR pipes) or moving parts (drive shafts, steering components, cooling fans).
-
Reconnect the electrical connector fully — an audible click confirms correct engagement. Ensure the locking tab is fully seated.
-
Reconnect the vehicle's battery after installation is complete.
Post‑Installation:
-
Start the engine and allow it to reach normal operating temperature (closed‑loop mode).
-
Verify that no exhaust gas leakage exists around the sensor bung (listen for “puffing" sounds or use a soap‑and‑water solution sprayed around the threads).
-
Use an OBD‑II scanner to clear any existing fault codes.
-
Drive the vehicle through a complete drive cycle (typically 10‑20 minutes of mixed driving: stop‑start traffic, steady cruising and moderate acceleration) to allow the ECU to re‑learn adaptation values and complete oxygen sensor and catalyst monitors.
6. Required Tools
| Tool | Purpose |
|---|---|
| O₂ sensor socket (22 mm / 7/8″) — offset type | Removal and installation of the sensor without damaging the flats or housing |
| Ratchet (3/8″ or 1/2″ drive) and extension bar | Access in confined engine bays (a long extension is often required) |
| Anti‑seize compound | ONLY required if the new sensor's threads are completely dry (check the manufacturer's instructions) |
| Jack and axle stands | If under‑vehicle access requires safe lifting |
| OBD‑II scanner (Hyundai/Kia‑compatible) | To clear fault codes, verify live sensor data and check monitor readiness status |
| Digital multimeter | For testing heater resistance (should be 11 – 18 Ω at 20 °C) and sensor voltage output if troubleshooting is needed |
7. Quantity Needed — Downstream Sensor
-
4‑cylinder Hyundai/Kia petrol engines typically have two oxygen sensors: one upstream (pre‑cat / regulating sensor) and one downstream (post‑cat / diagnostic sensor). This part is the downstream sensor.
-
V6 engines (e.g., Santa Fe 2.7L / 3.5L, Sorento 3.5L / 3.8L, Carnival 3.8L) may have two downstream sensors — one for each exhaust bank (Bank 1, Sensor 2 and Bank 2, Sensor 2). Check your vehicle's exhaust configuration before ordering multiple units.
-
If both upstream and downstream sensors are faulty, you will need the appropriate part numbers for each position — upstream sensors use different part numbers (e.g., 39210‑04000, 39210‑23710).
8. OE vs. Aftermarket Quality
-
Genuine Hyundai / Kia OE sensors are precision‑designed to meet the exact specifications of your vehicle's ECU.
-
Aftermarket sensors using cross‑reference numbers may vary in cable length, connector design and calibration parameters. Sub‑standard aftermarket sensors can lead to premature failure, inaccurate readings or persistent fault codes.
-
For guaranteed plug‑and‑play fitment and reliable performance, OE‑spec components are strongly recommended.
9. Professional Installation Recommended
-
While this is a direct‑fit part, professional installation is advisable if you are not experienced with exhaust system work or if the sensor is located in a difficult‑to‑reach position (e.g., deep inside the engine bay).
-
After replacement, the ECU may need to have adaptation values reset using manufacturer‑specific diagnostic equipment.
-
Improper installation can lead to:
-
Exhaust leaks around the sensor bung
-
Cross‑threaded or damaged exhaust bung threads (expensive to repair)
-
Sensor damage from contamination or mishandling
-
Wiring damage from contact with hot exhaust components
-
Persistent ECU fault codes despite a correctly functioning sensor
-
10. Warranty
-
Genuine Hyundai / Kia OE parts typically include a manufacturer warranty through authorised dealers.
-
Aftermarket sensors may offer varying warranty periods — commonly 1 to 2 years. Some suppliers offer extended warranties (e.g., 3‑year / 60,000‑mile coverage). Check with your specific retailer for their warranty terms and return policy.
-
Important: Most warranties are voided if the sensor tip shows contamination from improper handling (e.g., touching the tip, dropping the sensor, silicone exposure or installation with contaminated hands / tools). Oxygen sensors are often non‑returnable except for approved warranty replacement due to contamination risk.
11. Common Mistakes to Avoid
| Mistake | Consequence |
|---|---|
| Adding extra anti‑seize compound (if the sensor is factory‑coated) | The compound contaminates the sensor tip, causing premature failure |
| Touching the sensor tip | Skin oils permanently contaminate the sensing element |
| Dropping the sensor (even from a low height) | The fragile ceramic element cracks; the sensor becomes inaccurate or completely inoperative |
| Using silicone sealants anywhere near the exhaust system | Silicone vapour permanently poisons the sensor — the part is ruined and cannot be repaired |
| Over‑tightening the sensor | Damaged exhaust bung threads; expensive exhaust repair or replacement |
| Under‑tightening the sensor | Exhaust leaks cause false oxygen readings and persistent fault codes |
| Installing the sensor in the wrong position (upstream instead of downstream) | The ECU receives incorrect data; persistent fault codes and poor fuel economy |
| Failing to clear fault codes after replacement | The ECU continues using old adaptation values; the MIL may remain illuminated |
| Ignoring wiring / connector problems | A new sensor can also appear faulty if the harness is damaged or corroded |
| Using the sensor with a damaged or mismatched connector | The sensor cannot communicate with the ECU; possible damage to the vehicle's wiring harness or ECU |
Disclaimer: While we strive for accuracy, vehicle specifications and OE part numbers may vary by production date, market region and vehicle trim level. This part number (39210‑2ECC1) is a Hyundai / Kia OE number for a 4‑wire heated switching‑type downstream (post‑catalyst / rear) oxygen sensor on a wide range of 4‑cylinder petrol engines. Always verify physical fitment (4‑pin rectangular / oval connector, approx. 405 mm cable length, M18 * 1.5 thread) and confirm the position (downstream / rear / Bank 1, Sensor 2) of your old sensor before purchasing. For diesel engines, upstream (pre‑catalyst) applications, or vehicles with different connector shapes / colours, a different sensor is required. If in doubt, consult your vehicle's manufacturer specifications, an authorised dealer or a qualified mechanic.
Get in Touch
Have questions about our products or want to discuss a custom order? Our team is ready to help you.